
SimHub Setup for Tension
You are setting up REACTOR Tension Standalone.
Use the Tension Standalone controller configuration from this guide. Do not import the Motion controller file.
Setting up Motion, or Tension as an add-on to Motion?
Open the REACTOR Motion setup guide →
Your REACTOR Tension is already calibrated.
No further calibration in SimHub is needed nor recommended. Simply keep the existing calibration and follow the setup steps below.
Introduction #
To operate the Reactor Tension, the SimHub software is required.
This setup guide applies to the standalone use of the Reactor Tension.
If you are using the Tensioner as an add-on together with the Reactor Motion System, please continue here
1. Download and Install latest version of Simhub #
You can download the latest version of Simhub from the following link:
execute and install simhub.
2. Buy Simhub Licenses #
To unlock the Simhub Motion addon you need to buy two licenses:
– Buy general simhub License
– Buy Motion Addon License
3. Start Simhub #
Launch the Simhub application on your computer to begin the setup process.
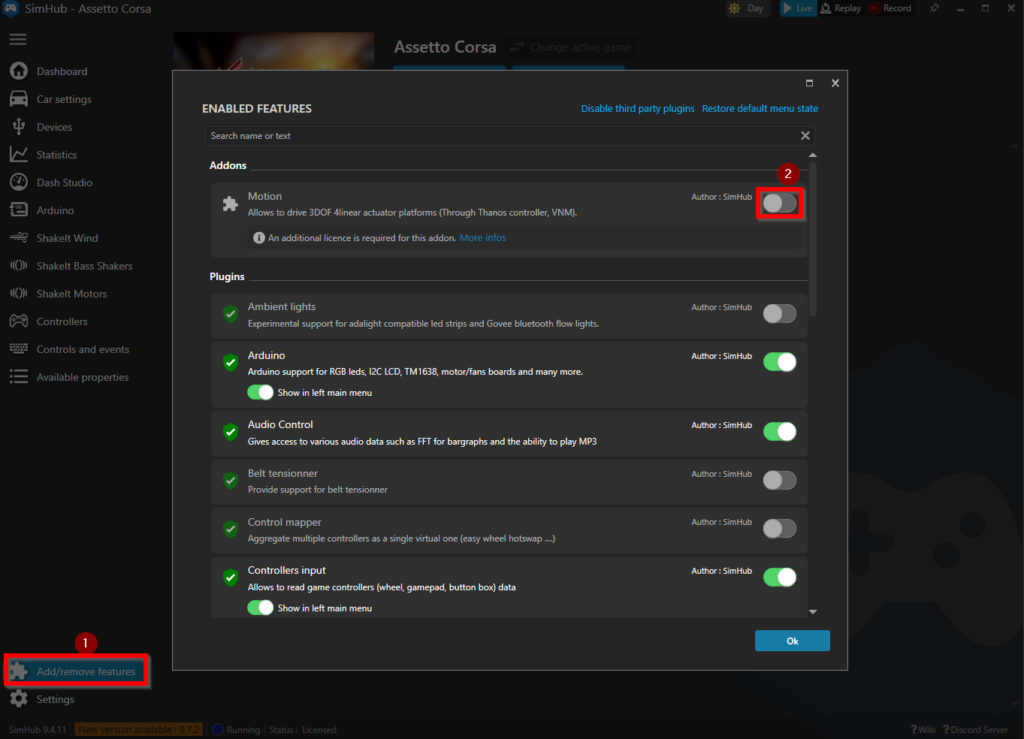
4. Activate Motion Plugin #
Once Simhub is running, the motion addon need to be enabled
1.) Click on “Add/remove features”
2.) press the enable Button of the Motion addon
5. Activate Licenses #
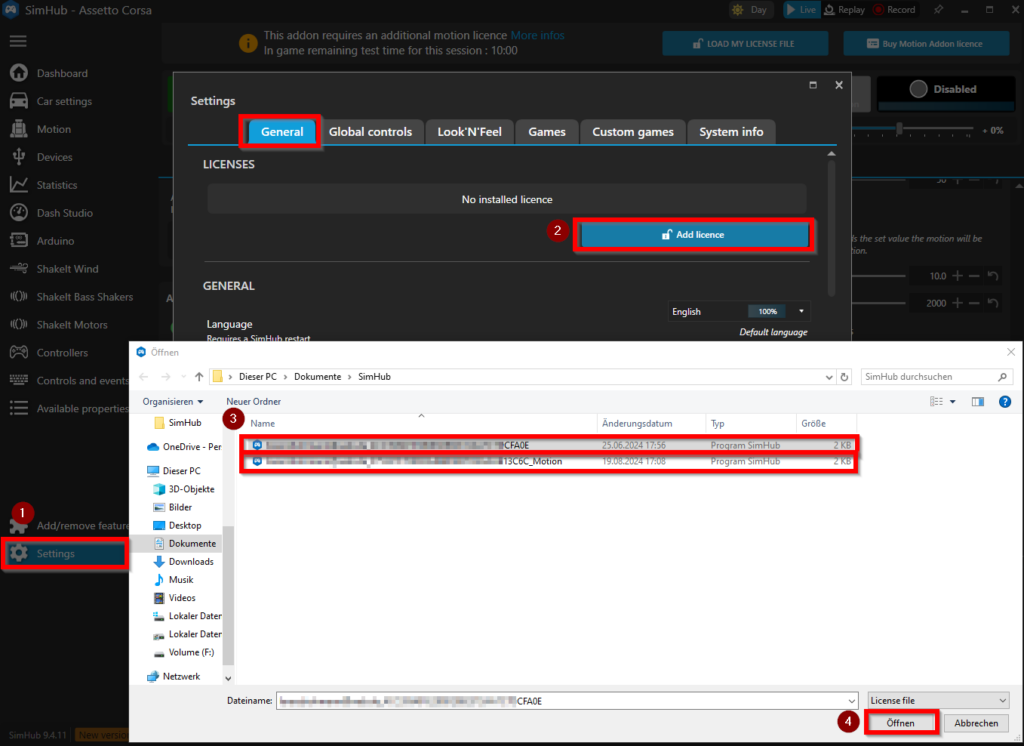
Make sure you bought the two licenses and safed the license files to your computer, provided from simhub by email.
1.) Navigate to “settings->general”
2.) press Add License
3.) choose a license file from your computer (only 1 can be choosen at one time)
4.) open the choosed file
5.) repeat for the other license
6. Configure Seatbelt Settings #
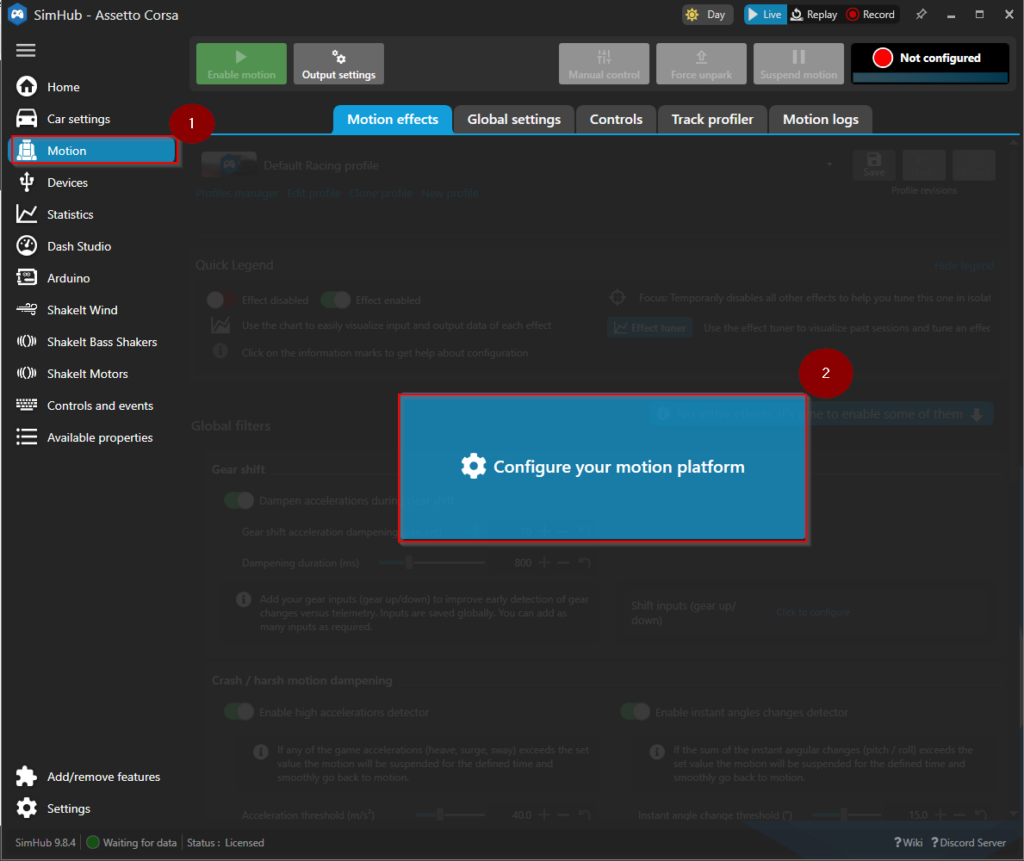
Follow the steps below to configure your REACTOR Tension Standalone.
1.) click on Motion
2.) Click on “Configure your motion platform”
7. Import Geometry Configuration #
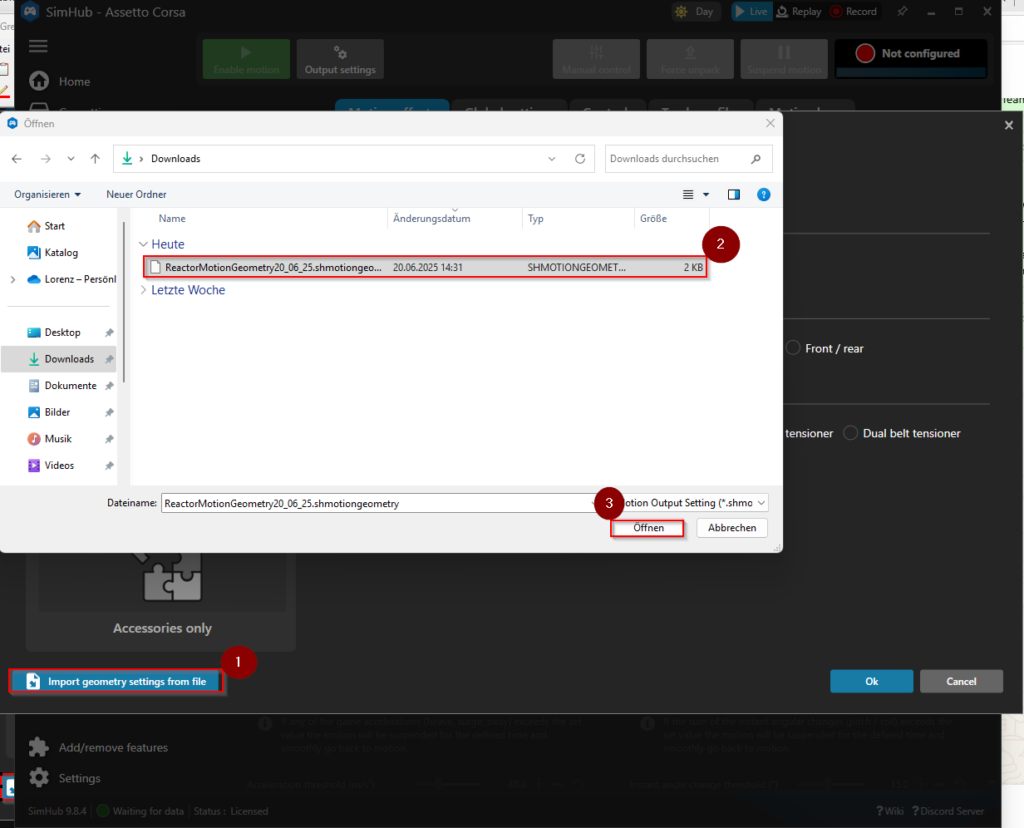
Download our pre-configured geometry configuration from SimReactor
Download Tension Standalone geometry configuration
1.) click on “Import geometry settings from file”
2.) choose the previous downloaded “*.shmotiongeometry” file in the browser
3.) open the file
8. Import Controller Configuration #
Before importing: this download is for REACTOR Tension Standalone. Use the controller file from this guide, not a file downloaded for the other product.
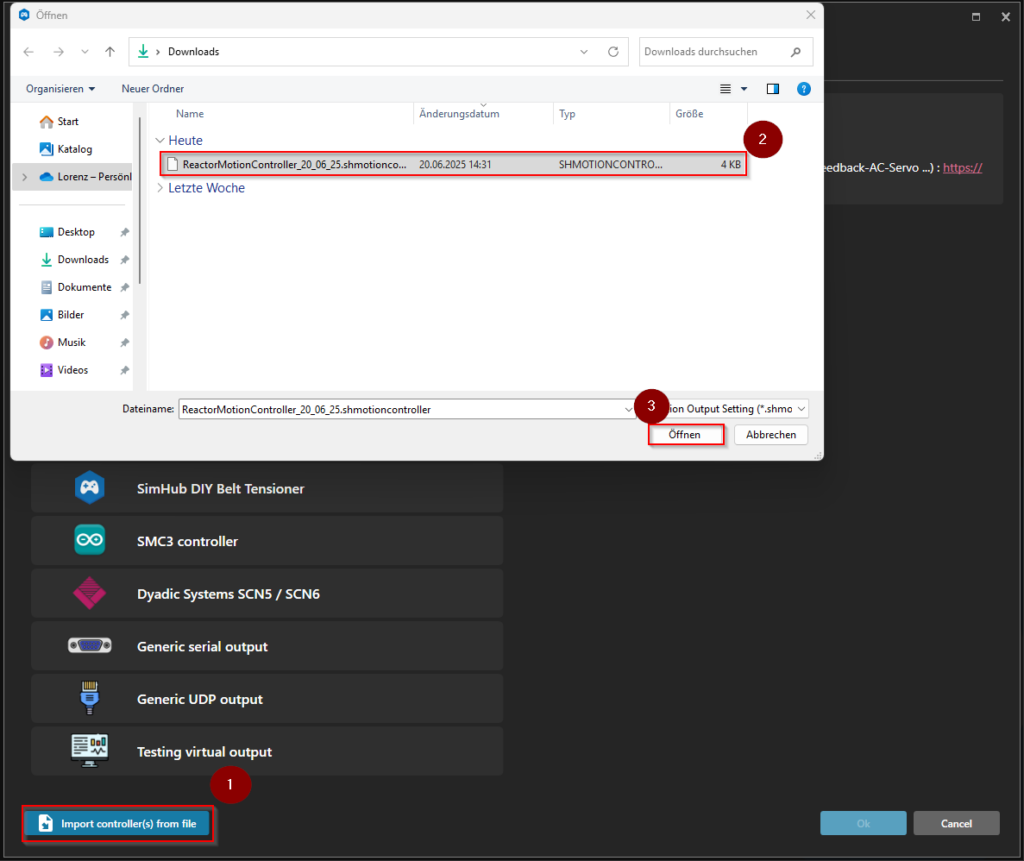
Download our pre-configured output controller settings from SimReactor
Download Tension Standalone controller configuration
1.) click on “Import controller(s) from file”
2.) choose the previous downloaded “*.shmotioncontroller” file in the browser
3.) open the file
9. Select your comport #
Select the COM port used by your REACTOR Tension Standalone control unit, as described below.
1.) Open “Settings” for the imported Tension Standalone controller.
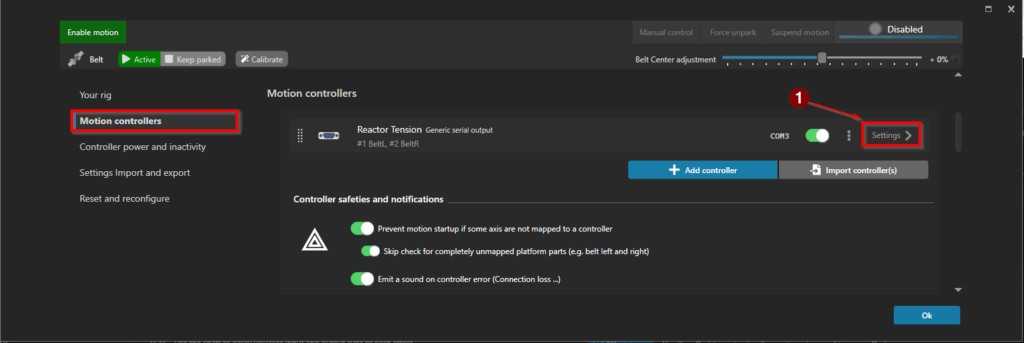
2.) Navigate to Controllers and choose the COM port the control unit is connected to via USB, in most cases it is shown as “FTDI”, if you can not find it, use the “identifiy” button
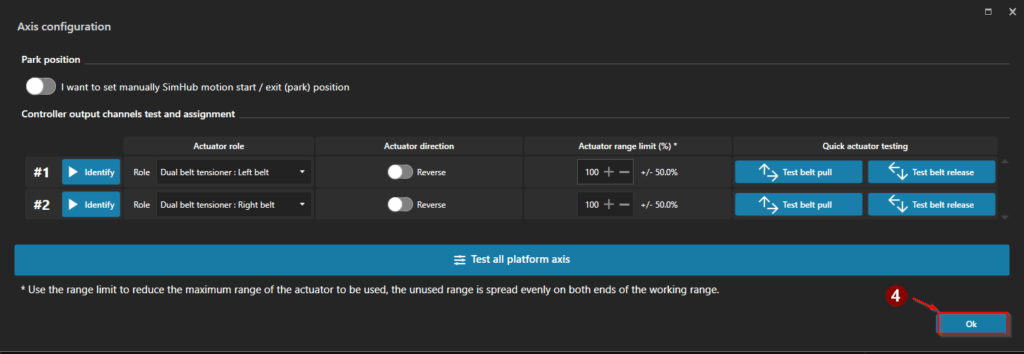
3.) Then press “Edit axis assignments”

4.) Axis are already assigned, please press “Ok”
10. Test the platform #
Now we can do a function test
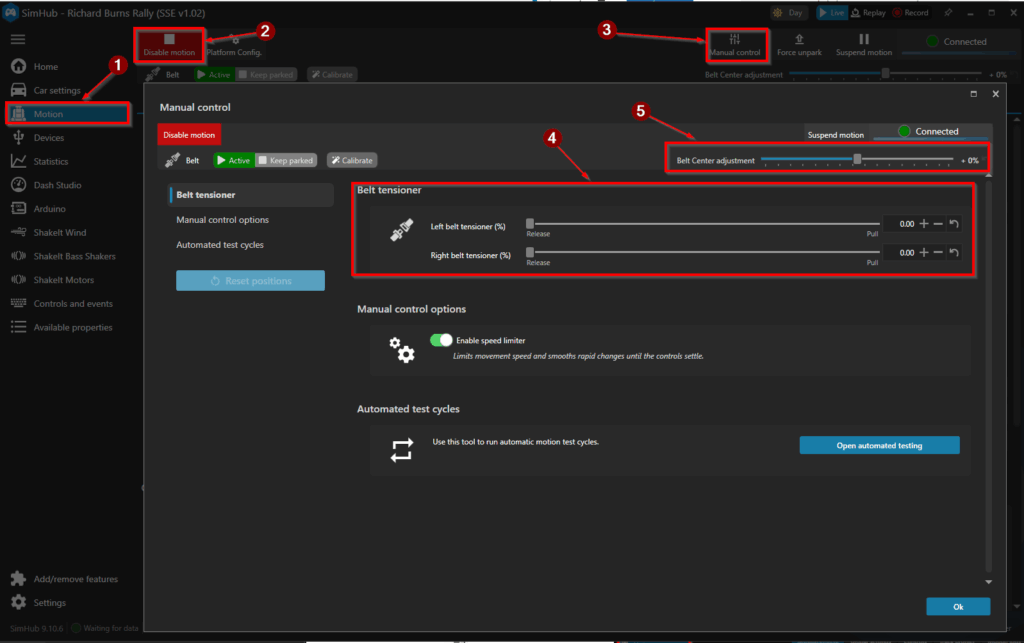
1.) Navigate to “Motion”
2.) Press “Enable Motion”
3.) Go to “Manual Control”
4.) Use the sliders to increase slowly the tension of the seatbelt on each site
11. Ready to tension #
Congratulation, your seatbelt is now ready for your favourite games. Some games need additional steps to activate telemetry data for simhub. Follow instructions on the simhub software.